

"Tenderly" For Beginners
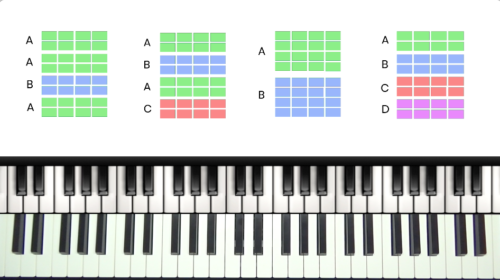
Welcome to the second jazz standard study in our Novice course on the key of Eb major. In this lesson, we will delve into the jazz ballad "Tenderly" which follows an A-B-A-C form.
This song is known for its spacious harmony and melody, which we will explore in detail in this module.
"Tenderly" – The A Section
We begin with the A section which is the 1st 8 bars of the tune. This section repeats twice within the song and so mastering these 8 bars will give us a solid foundation for learning and memorising the whole tune.
We start by playing through using simple 7th chords in their root positions to visualise the basic harmony of the tune. We then add the melody in our right hand with the basic 7th chords underneath.
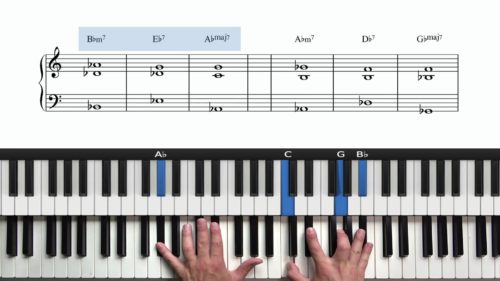
"Tenderly" Spread Voicings
To enhance the sound of our 7th chords, we spread the notes over 2 hands to create 2-handed spread voicings. This voicing approach creates a more balanced arrangement which avoids overlap between the melody and the chords and also prevents the dense note configurations that can occur with basic 7th chord voiced in root position.
By spreading the notes over 2 hands, we achieve a more balanced sound in our harmonies which forms the basis of a solo jazz piano arrangement.
Related Lessons
We introduce the concept of whole-step 251 drills, and how they can be an interesting alternative to drills around th...
Lead sheets are a useful tool when starting out with jazz, but by learning tunes by memory, it will benefit your play...
A seventh chord is a triad which has been extended to include the 7th degree of the scale. This creates a fuller soun...
Practice Tips
-
Visualise the Form: Remember that the song follows an ABAC form. Visualising this form when playing the tune will help to memorise and internalise the song's structure.
-
Voicing Transitions: Pay special attention to the 7ths falling to the 3rds in the 25 progressions. The main benefit of using 2-handed spread voicings is that we can connect the chords smoothly with minimal hand movement.
-
Experiment with Voicings: Try different spread voicings to find what sounds best to you. Remember that there is usually more than one option for a specific chord.
-
Practice Slowly: Practice slowly and take your time to clearly visualise the voice leading in 25, 251, and 36251 progression. This will enhance the fluidity in your playing.
- Listen! - Listen to lots of different interpretations of "Tenderly" on YouTube or Spotify to understand different approaches and styles. Remember that listening is the ultimate source of inspiration.
Hi Hayden,
Apologies if I asked this question already. Did you mention which version Real Book you were using for Tenderly? I have the 6th edition but I think you mentioned a different and perhaps better version.
Thanks,
Eric
Los Angeles
Hi Eric,
I hope you’re well!
I generally recommend to use the chord chart that is provided in the “Downloads” section of each lesson page as this most closely matches the chord changes that we are using in the lesson.
There are many editions and versions of the Real Books and each one is slightly different. The Real Books are also notorious have having mistakes and inaccuracies which can be confusing for new jazz piano students.
The Real Books can be useful to find alternate or updated chord changes, so it’s useful to have them, but understand that they are all slightly different and so it’s likely that you will see variations in the chord changes.
I hope that helps.
Best,
Hayden
Hi Hayden, hope you’re well.
I was looking to download the lead sheets for this course, but it seems that both the downloads for Tenderly & Somewhere over the Rainbow aren’t available. I’m seeing a “File wasn’t available on site” error for both. I checked a few of the other courses but they all seem to be fine so I don’t think it’s a browser issue on my end.
Many thanks, Mick
Hi Mick.
Thanks for letting me know – I am fixing this now.
I also see that the lesson chapters are not showing for these lessons. We moved the website to a new system last week and it seems that these files were not carried across correctly.
Please check back in 30 mins and it will be fixed.
Cheers,
Hayden
Perfect, that all looks good now Hayden, thanks for sorting that out!
Many thanks, Mick
Hi Hayden,
Hope you’re well. I am loving this lesson on “Tenderly” I have been working on it for several weeks and have a pretty good basic version down. In the first lesson of this song you mention how one might dress it up a bit. But I must have overlooked that part in the later lessons. Do you have any suggestions or resources I could look up to help me add to “Tenderly’?
Thank you very much.
Brian
Hi Brian,
I’m glad you are enjoying these lessons – thanks for letting me know.
Yes I used the tune ‘Tenderly’ as a focus song for my seminars on Upper Structure Triads in January. Check out the seminars here and you can use the chapter markings to find the section which focus on the tune Tenderly:
pianogroove.com/live-seminars/usts-scale-degree-analysis/
pianogroove.com/live-seminars/usts-runs-space-fillers/
pianogroove.com/live-seminars/upper-structure-tritone-relationships/
This is a great tune for applying upper structure triad theory and so I’m sure you will enjoy the seminars above.
—–
I also have a few older tutorials on this song which you can find below. These were recorded many years ago and so the production quality is not as good as the most recent lessons but I’m sure you will still find some valuable insights in these lessons:
pianogroove.com/jazz-piano-lessons/tenderly-jazz-standard/
pianogroove.com/jazz-piano-lessons/tenderly-tutorial-part-2/
I hope that helps Brian and let me know if i can be of further assistance.
Best,
Hayden
Hi Hayden,
Thank you so much for this. I’m sorry I missed the seminar in January.
But I appreciate you linking to it here. Your lessons are so well done. I am learning so much and having fun!
I greatly appreciate all your hard work and your gracious and kind support.
Take care.
Brian
Hi Hayden,
I am loving these lessons, thank you so much.
Do you know if it’s possible to adjust the volume up or down in the player when using an iPad or iPhone? Currently it only seems to mute or unmute.
I ask because I’m using a midi keyboard and playing through another app – and I need to adjust the volume levels so I can play along.
Thanks!
Ian
Hi Ian,
Thanks for the comment and I’m really glad to hear you are enjoying the lessons!
It is possible to adjust the volume controls on laptop/desktop.
I just tested on my iPhone and I see that it’s only possible to mute or unmute, and so it seems the only way is to adjust the volume is on the iPhone itself using the volume controls on the side of the device.
I will ask the video player developers if it’s possible to add the volume controls onto the player for iPhone and iPad – I agree it would be more user-friendly to be able to control the volume directly from the player.
I will get back to you asap and please let me know if you have any other questions.
Talk soon,
Hayden
Awesome, thank you! It looks like it’s probably an iOS issue, but just thought I’d ask anyway. Cheers!
Really nice… Love the tune, and the spread voicings make it rich and alive!
Hi Mark,
Thanks for the comments and I’m glad you enjoyed the lesson.
Yes the spread voicing technique really brings a lead sheet to life.
It could be nice to introduce some upper structure triads into your basic arrangement. I covered this tune in a series of seminars earlier this year. Here is the first one: pianogroove.com/live-seminars/usts-scale-degree-analysis/
This is more advanced than 3-note spread voicings but it’s nice to ‘get our toes wet’ in more advanced theory – even as a beginner.
You can find the full series of UST seminars in this forum thread – community.pianogroove.com/t/january-2025-upper-structure-triads/12629 – but start with the session that I outline above.
If you have any questions with the material don’t hesitate to get in touch.
Cheers,
Hayden
Hi Hayden,
At 15:08 you switch fingers on the F note without playing it again – apparently using it as a stepping stone to prepare for the next chord/notes? Can you elaborate on this technique and provide examples of situations where you are most likely to apply it? Thanks!
Hi Nivaldo,
Yes here I am switching my finger whilst the note is held down. This allows me to free up my right hand thumb, index, and 3rd fingers to play the harmony underneath.
I also do the same thing in pickup bar of “Misty”, please see here around 08:50 – pianogroove.com/jazz-piano-lessons/misty-a-section/ (the ‘pickup bar’ is the incomplete bar that precedes the start of the song, in the case of Misty it is the notes Bb and G, and then the songs starts on Ebmaj7).
I’m essentially freeing up my right hand to help with the harmony. I’d think of this as ‘a pivot’ which allows the melody to keep ringing out, whilst the hand rearranges its position to help out the left hand with the harmony.
I use this technique mainly when playing jazz ballads compared to faster up-tempo jazz, as we have more time to make ‘the pivot’ and rearrange the position of the hand.
In the example that you point out in this lesson at 15:08, if I played the note F with my right thumb, then the rest of my right hand would become redundant, as we always voice the chord tones under the melody note. The ‘pivot’ in my fingering allows my right hand thumb and fingers to stay mobile, and most importantly stay under the melody note so that they can play the harmony.
I hope that helps Nivaldo. As you study more of my jazz standard lessons you will certainly see more examples of this. The “Misty” reference above is a good example.
Please let me know if i can help further.
Best,
Hayden
The whole aspect of keeping the melody ringing out is in itself a big topic for me.
I say this because I do not yet make much use of the pedal and thus keep looking for fingering strategies that allow the melody to ring out without using it. Perhaps you have much to say about this? (I’m all ears!)
But let me focus also on the details of the pivot, at least in this case. You use the following fingers leading to the pivot:
Bb -> 2
C -> 3
Eb -> 5
D -> 5
So, you slide the pinky from Eb to D, thus *facilitating finger 4 to hit Bb* again (and then finger 3 to hit Gb, and finally pivoting from finger 4 to 5 on F).
But what I was doing was to use finger 5 on Eb BUT then *4 on D*. It looked natural. I did not think of using finger 5 for both notes using a slide. Very importantly, this caused finger 4 to be “trapped” between the Bb and Eb keys and thus the thought never came to use it to hit Bb on the way to the pivot. This is a small but decisive detail! I think you would agree with me on stressing this point.
I keep saying and thinking to myself…fingering is where the rubber meets the road…I may try to change the culture to say “where the fingers meet the keys” ;-)
Hi again, I made an important edit to the previous message, saved it but the editor did not take the change…not sure what is going on there. So here is the important correction:
Very importantly, this caused finger 4 to be “trapped” between the Db and Eb keys…
So, trapped between >>>Db<<< and Eb (I am sure this error was obvious to you but still…better to have it clarified anyways.)
Hi Nivaldo, 👋
Yes the point you make with the fingering is valid. There are often other variables at play which means that our fingering needs to be dynamic.
Indeed when playing spread voicings, the 4th finger could become ‘trapped’ with the fingering that you outline.
Conversely, please take a look at this lesson – pianogroove.com/jazz-piano-lessons/tenderly-tutorial-part-2/ – specifically 09:10 into the video where we play Tenderly with a stride left hand style.
You will notice that when playing a left hand stride style, I do use my 4th finger on the note D. Exactly as you pointed out it’s a logical choice of fingering and it works fine when playing stride left hand. When playing a stride left hand style, the right hand does not need to fill in the chord tones, and so our melody fingering is less ‘restricted’ in many ways.
Remember that are many ways to play a jazz standard, and the fingering of the melody should be flexible and dynamic to accommodate this. This is why I don’t like to specify fingerings in the first place.
This lesson is part of the Chord Extensions course which is one of the next courses you will study: pianogroove.com/jazz-piano-lessons/extended-chords-voicings/
—-
Regarding the ‘finger pivot’ – I just played the A Section of Tenderly a few times, and sometimes I do that ‘pivot’ with my right thumb to the pinky finger. So my thumb lands on the note F, then i keep the note held down and pivot onto the pinky which then frees up my right hand fingers and thumb. That works too.
Ultimately, experiment with different fingerings, play lots of tunes, and with time your fingering choices will become more intuitive and also more dynamic to allow you to play in different styles (spread voicings vs. left hand stride style, as an example).
Cheers,
Hayden
ps. thanks for letting me know about the comment edit issue – I have asked the developer to fix that.